All images on this site may be viewed in 3D. The pictures are displayed side by side in groups of three. The left pair (1 & 2) are for "cross-eyed" viewing. The right pair (2 & 3) are for "parallel" viewing. (See below)
Be sure to try both methods, as most people find one to be easier than the other. (This web-site is a lot more fun in 3D!)
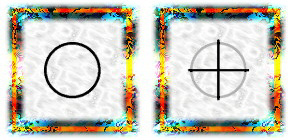
The "o" and "+" represent the two images of a photo pair. Touch your index finger to the computer screen, directly between the "o" and the "+". While looking at the tip of your finger, slowly move it toward your face. Notice that, in the background, the "o" and "+" are moving toward each other. At a certain point, the "+" will appear to be inside the "o". Memorize the feeling in your eye muscles. When you can sustain the effect after lowering your hand, you are ready to try it with the image pair.
Be careful to keep your head level, (especially the side to side tilt). When it appears that there are three images, concentrate on the middle one until it becomes 3D.
Start with your face close to the screen. The "+" will appear to be inside the "o". (If your screen is large, you may have to back away a bit.) Relax your eyes, and slowly back away, maintaining the effect. (This feels the same as viewing "Magic Eye" or "Random Dot Stereogram" pictures.) Try this with a photo pair. When there appear to be three images, concentrate on the middle one until it becomes 3D.
"Parallel-Viewing" may be more difficult on a large screen if the width of any single image is wider than the distance between your eyes. Reducing image size or sitting farther away may help.
CAUTION! If you experience eye fatigue or discomfort, take a break!
Home | Figure Studies | Sailing | On the Road | 3D Video | Ray & Susan | E-Mail